I hope you had a wonderful time with family and friends and had a memorable and loving Christmas. I was a really lucky girl and got Paper Lace Cricut Cartridge and some other great craft items. I will post some projects soon.
Big hugs
Jen
Monday, December 27, 2010
Wednesday, December 22, 2010
Christmas Greetings
Hi everyone,
Thanks for being a wonderful community and for inspiring me and stretching my creative muscle. I hope that I have been able to give a small fraction back to you with my blog and some of the projects I have shared.
Wishing you all a wonderful Christmas and festive season and love, happiness and lots of crafting time.
Big hugs
Jen
Wednesday, December 15, 2010
Mosaics
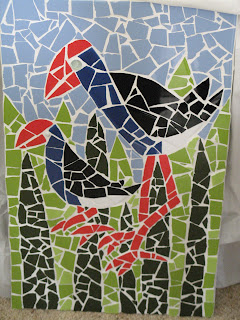
I am so glad I managed to find my camera, here are the long awaited pictures of my mosaics. Thanks so much Angie for all your help with them. I found out that I am allergic to the dust created when making mosaic images. I created the design and chose the colours and went to begin the project and it was a nightmare as the dust caused me to sneeze, splutter and choke!!! However, despite my issues with it, they turned out really well. It is quite large (approx 12" by 24" in size) and is going to be hung at the front door, just waiting for the other half to mount it.
This one is a pukeko which is a New Zealand Native Bird.
This one is a pukeko which is a New Zealand Native Bird.

A challenge I have just completed - Takeout Coffee hand protector sleeve

Takeout coffee protectors
Materials needed:
Template (I used one from Starbucks)
Felt
Fabric (preferably light coloured)
Elastic
Lumiere Metallic Paint
Stazon
Stamps
Alcohol inks
Thread (and machine)
Beads (optional)
Kindy Glitz (optional)
Step 1:
Cut 1 piece of fabric (I used unbleached calico)


 Cut 1 piece of felt (I used white felt)
Step 2:
Paint lumiere paint as desired to give some definition to the fabric. I chose to paint the border of my fabric and patches to enable me to stamp onto it. Allow to dry.

Step 3:
Stamp desired images using Stazon. I used Stazon Black, but this would also be effective in reds, greens for Christmas colours. Heat set with an iron.

Step 4:
Drop alcohol ink to give colour to your design. I used bottle and terracotta. I heat set this with the iron

Step 5:
Pin the felt and the decorated fabric together. I machine stitched this together and used metallic gold thread to give a little shine.

I then trimmed the edges neatly and changed my thread to machine embroidery green thread. I added detail to the holly leaves.
Step 6:
I then stitched a cluster of red beads in different sizes and styles to the area which was the holly berries.
Step 7:
I added gold kindy glitz to the odd berries and as a ‘shadow’ to the holly leaves.


Step 8:
I then stitched two pieces of elastic to the insides of the fabric and my hot drink protector is now complete.
You can also add alcohol ink at this stage.
Stitch the fabric piece to the felt and embellish as you desire. I added some machine stitching, beads and kindy glitz.

Enjoy!!!
P.S sorry I did not have a sample of a coffee cup, but hopefully the glass gives you a good idea of how it works.


Tuesday, December 14, 2010
And some more... More masculine cards


Hope you enjoy these, thanks Luanne for your help with these ones!!! I love the colour and designs for this.
And yet another...


More Snowflakes!!!! I love the snowflake embossing folders in the cuttlebug embossing pack. It is so versatile and I love how the folders are now larger too!!! I added some gems, some thickers and what simple yet effective cards.
And another...
Hope you are not bored of my cuttlebug designs yet, as I have a few more to go...


This is a quick and easy card using the snow flurry embossing folder and some gorgeous snowflake paper and adding a create a flake spellbinder cut snowflake. Add a few gems and a sparkly card.
And another...


Another cuttlebug card

Another cuttlebug card

Once again using the cuttlebug, I cut some flowers using the quilling kits and embossed one of my mats with the blossom folder from the asian bundle. I added some pearls and some thickers for the 50.
Thanks so much for looking and have a wonderful day.
Cuttlebug Projects
Hi everyone,
I was really fortunate to demonstrate the cuttlebug and make some samples and show customers how the fabulous machine works on Saturday.
I will be posting a few of the projects that I came up with.
Hope you enjoy!!!

I was really fortunate to demonstrate the cuttlebug and make some samples and show customers how the fabulous machine works on Saturday.
I will be posting a few of the projects that I came up with.
Hope you enjoy!!!

This card was made using the fabulous cuttlebug quilling flowers. The small flowers were made by cutting the centre quilling piece in half and then only using the small petals.I embossed the background using the large snowflake embossing folder. I cut out some holly leaves from a sheet of American Crafts cardstock. All the paper was either American Crafts or Provocraft Cricut cardstock.
Hope you like it!
Saturday, December 11, 2010
December already....
Hi everyone,
I hope you are well and the stress and excitement of Christmas is treating you all well. I have been meaning to post some projects and images, but somehow time seems to be in limited quantaties at the moment. I have heaps of cards to photograph and load and will try and get them done by monday. I also have some great gift ideas to load that I have made. But can't do that till Wednesday as I don't want to spoil the surprises...
Big hugs
Jen
Friday, November 5, 2010
All finished....
I can't believe that is all behind me now and I have finished all my exams and assessments. I am so relieved, and I am sure that my partner is too...
I now have some time to craft, and can't wait to start creating beautiful projects. I picked up my two new cartridges yesterday. I got two lite cartridges (Botanicals and Handy Man) and can't wait to come up with some projects. Watch this space in the next couple of weeks....
Big hugs and have a wonderful day.
Jen
Thursday, October 28, 2010
Free Cricut Cartridges
Hi everyone,
If you have a Cricut Gypsy, go to the following link http://www.cricut.com/gypsy/promo/default.aspx and register your Gypsy.
This will allow you to download free cartridges...
How exciting.
Have a wonderful day and will catch up soon. I will be trying out some new Cri-Kits and hopefully these work really well. Cant wait for the end of next week when my exams are all finished.
Cheers
Jen
Monday, October 25, 2010
Quick Post
Hi everyone, hope you are all well and creating stunning projects. I have my first exam on Wednesday and have been studying for this. I can't wait till the 5th of November when I complete all my assesments for the year. I have a list of creations I want to work on as soon as I can and can't wait to share them with you.
All the best
Jen
All the best
Jen
Tuesday, October 5, 2010
October
Hi everyone, thanks so much for taking the time to visit my blog. I love creating and sharing and get so much inspiration from wonderful people who share their work. I hope that with this blog I give a little back. Unfortunatly, this month is going to be really busy with final assessment and exams for the year. I can't wait till I complete it all and have some time to create. Sorry that the posts will be minimal.
Hope you all have a wonderful day!!!
Big hugs
Jen
Hope you all have a wonderful day!!!
Big hugs
Jen
Thursday, September 30, 2010
Wedding Favour Boxes
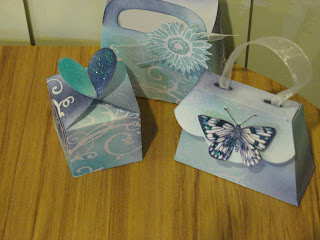
These bags were all cut using the Cricut and Tags, Bags, Boxes and More. I love this cartridge, it is so versatile. These were all cut on plain white cardstock. I used the SU baroque motifs large swirl to stamp the image on the bags and heat embossed it with clear embossing powder. I then inked it with SU baja breeze, night of navy and taken with teal. I added some stamped images (inkadinkado flowers and hero arts poetic prints butterfly's) and some organza ribbon, a little crystalina kindy glitz and created three different favour boxes.
 I hope you like them.

More pictures
Here are a few more pictures of the engagement and the celebratory party!!! Any questions, please leave a comment and I will reply as soon as possible.
.jpg)
.JPG)

.JPG)
.JPG)
.jpg)
.JPG)

.JPG)
.JPG)
The end of the month....
I am really relieved that today is nearly over. I had an assignment due today and I have not been well with a horrid head cold, so am much happier and less stressed now that it is all submitted. The end of the semester is coming up fast and with a number of assignments and exams, I won't have as much time to craft... I know, this is really sad news!!!
I have had time to create a few projects, but I have not had that much time to post them. Sorry about that. Hope you enjoy the projects. I have been looking at all the amazing blogs out there and all the Autumn (Fall) colours are out at the moment and the warm rusts and reds and vibrant golds are just beautiful.
We have just had a nice spell of weather and it is lovely to enjoy our spring weather. I keep noticing all the buds and little leaves back on the trees and the early spring flowers are looking stunning. My beautiful ragdoll cat is molting and leaving her trail of hair wherever she has been.
Hope you have a wonderful day and enjoy the pictures. The first one is a butterfly cut out of the tag along butterfly set by cuttlebug then embossed and inked and embossed again with an inked folder. I love this technique. I then added some kindyglitz and I have a beautiful spring butterfly.
The bags are just gorgeous and I love how they turned out. I cut them using my Cricut and Tags Bags, Boxes and More cartridge. I used the double embossing technique as per the butterfly and the inks are Tim Holtz inks in Bundled Sage and Victorian Velvet for the pink and green one and Faded Denim and Peeled Paint for the blue one. I added some crystal organza and wrapped one of my pendants and had a gift to go...(I made matching cards too... Will post with the next lot of pictures.


Friday, September 17, 2010
Still quilting
Hi everyone, I have not given up on papercraft just yet, but I am really enjoying quilting at the moment, and after a long spell of having my quilts on the backburner, it is fabulous to get behind the machine and create something again. I love threadwork and creating a stunning background on a quilt is such a great feeling for me. I love the experience and find it quite therapeautic.
I have completed all the blocks so far and appliqued my designs onto the surface and I have begun the fun part of stitching... I have hit a temporary snag (I don't have the colours I need) so have ordered some Sulky Threads and they should arrive soon..... I will post photos of the finished quilt soon.
Have a wonderful weekend
Tuesday, September 14, 2010
More generous bloggers and their amazing generosity
Giselle from http://crossmyheartpapercrafts.blogspot.com/ is another amazingly generous paper crafter (I am so glad I belong in this category as everyone is so lovely) and she has sent me the pattern for her lovely cracker box. Thank you so much for that Giselle and can't wait till tomorrow when I can play with my papers and glues and try these inspirational projects from these two wonderful ladies.
Thank you.
Thank you.
Generosity and wonderful people
I put a comment on this blog http://flos-a-scrapin.blogspot.com/ and this wonderful woman emailed me and then gave me a call and described the process to make stunning creations. Thank you so much Flo for your amazing generosity and kindness. I love your designs and can't wait to try them out...
The apron design is a firm favourite so far, and should be a nice addition to my recipe card book and I have a wonderful book called Christmas Gifts from the kitchen which allows me to make cookie and cake mixes to give where all that is needed is to add liquid ingredients.
Thanks again Flo.
The apron design is a firm favourite so far, and should be a nice addition to my recipe card book and I have a wonderful book called Christmas Gifts from the kitchen which allows me to make cookie and cake mixes to give where all that is needed is to add liquid ingredients.
Thanks again Flo.
Monday, September 13, 2010
Mosaics
This is one craft that I won't be taking up ... I started a mosaic picture a few weeks ago and when I started cutting the tiles realised that I am allergic to the dust it causes... I had to have a friend finish my designs for me (being ambitious, I started not just one, but two designs...), however, in return I have background quilted a wall quilt for her. I will post pictures of both projects soon. The mosaics look fabulous and I am so grateful to her for finishing them for me and I hope she loves her quilt now that it is all quilted.
Wedding Planner Journal
I created this for the bride to be to be able to write down all her lists, keep track of important dates and appointments and organise the big day. There are plenty of pages to put swatches of fabric, images of cakes and table decorations, times to meet with the family and other wedding party members and dates to pick up dresses etc. I got a visual diary (pre bound and cut etc, but easily made with a Zutter or Cinch if you like) I created the dividers with spellbinder nested hearts dies and cut out a whole lot. I then added black kindyglitz to the edges and pasted them to the sides of the pages to make file dividers.
I then cut several different sizes of the hearts for the cover out of fun foam and heated it and pressed in several cuttlebug images. I then added a handmade rose (using Tim Holtz technique to make roses) using the Cricut Wildcard Cartridge to make the initial flower. I added a swirl of diamante bling and some kindyglitz and shaved crystals. I tied organza and satin ribbon on the spine and inside I added some stamping and rubons in a love related theme.
 Thanks for looking!
I then cut several different sizes of the hearts for the cover out of fun foam and heated it and pressed in several cuttlebug images. I then added a handmade rose (using Tim Holtz technique to make roses) using the Cricut Wildcard Cartridge to make the initial flower. I added a swirl of diamante bling and some kindyglitz and shaved crystals. I tied organza and satin ribbon on the spine and inside I added some stamping and rubons in a love related theme.

Engagement Album - Sneak Peak
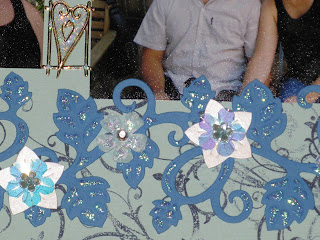
Here are a few sneak peaks at the engagement album that I created, some beautiful flowers, sparkle and shine and a theme of blues compliment the design and created a beautiful album which I hope the receipients are happy to remember their special moment!!!


Hexagons and Bedford Scrapbook Layout
Hope you are all well and having a great time. Being in Auckland, I was sufficiently far away from Christchurch so that we were not affected at all by the recent quakes. My thoughts are with you all during this time while you rebuild and reflect.
I posted a layout of Bedford a while ago and here is the other layout I did for my photo's from there. I loved the brick buildings and took hundreds of photos (my six week trip was documented with over 6000 photo's so I have been selective (or as selective as you can be when looking at so many images) and these made the final cut. To prevent having about 3000 albums for one holiday, I have done a lot of layouts where I try to incorporate multiple photos on my layout and also try and use all the pamphlets and memorabilia that I dragged home.
Hope you enjoy. The font is Cuttlebug 'Hippie Chick' and the hexagons are using my Creative Memories Custom Cutting System. I started off my paper crafting with these tools and still reach for them as an when I need. I still need to work out how to 'create' larger shapes like these on my cricut as this will make the whole process a lot easier.
+-+Copy.JPG)
Thursday, August 26, 2010
12" x 12" scrapbook paper books with pockets
These are so much fun to make, you take a 12x12" sheet of paper and fold it in half then in half again. I used white paper and then bind them together with two 6x6" chipboard covers that you have decorated as desired.
To create the stunning red butterfly book, I used the fabulous Mariposa DCWV cardstock for embellishing the covers and adding accents to the pages. I used Stampin Up ink in ruby red,rose red and pumpkin pie to add colour and stamp the hero arts butterflies. I also used versamark clear and clear embossing powder to create the gloss finish on the cover.
The blue and green creation was a class I attended. This used the Stampin Up range of papers and colours. The predominant colours were Night of Navy and Kiwi Kiss. The Urban Series of paper was used for the embellishments.
Both books were bound using a Zutter Bind-It-All.

 Hope you enjoy!
To create the stunning red butterfly book, I used the fabulous Mariposa DCWV cardstock for embellishing the covers and adding accents to the pages. I used Stampin Up ink in ruby red,rose red and pumpkin pie to add colour and stamp the hero arts butterflies. I also used versamark clear and clear embossing powder to create the gloss finish on the cover.
The blue and green creation was a class I attended. This used the Stampin Up range of papers and colours. The predominant colours were Night of Navy and Kiwi Kiss. The Urban Series of paper was used for the embellishments.
Both books were bound using a Zutter Bind-It-All.


Subscribe to:
Posts (Atom)