I hope you had a wonderful time with family and friends and had a memorable and loving Christmas. I was a really lucky girl and got Paper Lace Cricut Cartridge and some other great craft items. I will post some projects soon.
Big hugs
Jen
Monday, December 27, 2010
Wednesday, December 22, 2010
Christmas Greetings
Hi everyone,
Thanks for being a wonderful community and for inspiring me and stretching my creative muscle. I hope that I have been able to give a small fraction back to you with my blog and some of the projects I have shared.
Wishing you all a wonderful Christmas and festive season and love, happiness and lots of crafting time.
Big hugs
Jen
Wednesday, December 15, 2010
Mosaics
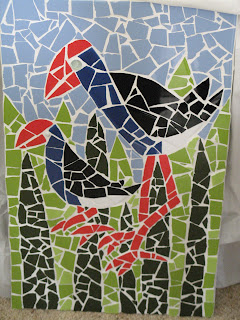
I am so glad I managed to find my camera, here are the long awaited pictures of my mosaics. Thanks so much Angie for all your help with them. I found out that I am allergic to the dust created when making mosaic images. I created the design and chose the colours and went to begin the project and it was a nightmare as the dust caused me to sneeze, splutter and choke!!! However, despite my issues with it, they turned out really well. It is quite large (approx 12" by 24" in size) and is going to be hung at the front door, just waiting for the other half to mount it.
This one is a pukeko which is a New Zealand Native Bird.
This one is a pukeko which is a New Zealand Native Bird.

A challenge I have just completed - Takeout Coffee hand protector sleeve

Takeout coffee protectors
Materials needed:
Template (I used one from Starbucks)
Felt
Fabric (preferably light coloured)
Elastic
Lumiere Metallic Paint
Stazon
Stamps
Alcohol inks
Thread (and machine)
Beads (optional)
Kindy Glitz (optional)
Step 1:
Cut 1 piece of fabric (I used unbleached calico)


 Cut 1 piece of felt (I used white felt)
Step 2:
Paint lumiere paint as desired to give some definition to the fabric. I chose to paint the border of my fabric and patches to enable me to stamp onto it. Allow to dry.

Step 3:
Stamp desired images using Stazon. I used Stazon Black, but this would also be effective in reds, greens for Christmas colours. Heat set with an iron.

Step 4:
Drop alcohol ink to give colour to your design. I used bottle and terracotta. I heat set this with the iron

Step 5:
Pin the felt and the decorated fabric together. I machine stitched this together and used metallic gold thread to give a little shine.

I then trimmed the edges neatly and changed my thread to machine embroidery green thread. I added detail to the holly leaves.
Step 6:
I then stitched a cluster of red beads in different sizes and styles to the area which was the holly berries.
Step 7:
I added gold kindy glitz to the odd berries and as a ‘shadow’ to the holly leaves.


Step 8:
I then stitched two pieces of elastic to the insides of the fabric and my hot drink protector is now complete.
You can also add alcohol ink at this stage.
Stitch the fabric piece to the felt and embellish as you desire. I added some machine stitching, beads and kindy glitz.

Enjoy!!!
P.S sorry I did not have a sample of a coffee cup, but hopefully the glass gives you a good idea of how it works.


Tuesday, December 14, 2010
And some more... More masculine cards


Hope you enjoy these, thanks Luanne for your help with these ones!!! I love the colour and designs for this.
And yet another...


More Snowflakes!!!! I love the snowflake embossing folders in the cuttlebug embossing pack. It is so versatile and I love how the folders are now larger too!!! I added some gems, some thickers and what simple yet effective cards.
And another...
Hope you are not bored of my cuttlebug designs yet, as I have a few more to go...


This is a quick and easy card using the snow flurry embossing folder and some gorgeous snowflake paper and adding a create a flake spellbinder cut snowflake. Add a few gems and a sparkly card.
And another...


Another cuttlebug card

Another cuttlebug card

Once again using the cuttlebug, I cut some flowers using the quilling kits and embossed one of my mats with the blossom folder from the asian bundle. I added some pearls and some thickers for the 50.
Thanks so much for looking and have a wonderful day.
Cuttlebug Projects
Hi everyone,
I was really fortunate to demonstrate the cuttlebug and make some samples and show customers how the fabulous machine works on Saturday.
I will be posting a few of the projects that I came up with.
Hope you enjoy!!!

I was really fortunate to demonstrate the cuttlebug and make some samples and show customers how the fabulous machine works on Saturday.
I will be posting a few of the projects that I came up with.
Hope you enjoy!!!

This card was made using the fabulous cuttlebug quilling flowers. The small flowers were made by cutting the centre quilling piece in half and then only using the small petals.I embossed the background using the large snowflake embossing folder. I cut out some holly leaves from a sheet of American Crafts cardstock. All the paper was either American Crafts or Provocraft Cricut cardstock.
Hope you like it!
Saturday, December 11, 2010
December already....
Hi everyone,
I hope you are well and the stress and excitement of Christmas is treating you all well. I have been meaning to post some projects and images, but somehow time seems to be in limited quantaties at the moment. I have heaps of cards to photograph and load and will try and get them done by monday. I also have some great gift ideas to load that I have made. But can't do that till Wednesday as I don't want to spoil the surprises...
Big hugs
Jen
Subscribe to:
Posts (Atom)