Giselle from http://crossmyheartpapercrafts.blogspot.com/ is another amazingly generous paper crafter (I am so glad I belong in this category as everyone is so lovely) and she has sent me the pattern for her lovely cracker box. Thank you so much for that Giselle and can't wait till tomorrow when I can play with my papers and glues and try these inspirational projects from these two wonderful ladies.
Thank you.
Tuesday, September 14, 2010


Generosity and wonderful people
I put a comment on this blog http://flos-a-scrapin.blogspot.com/ and this wonderful woman emailed me and then gave me a call and described the process to make stunning creations. Thank you so much Flo for your amazing generosity and kindness. I love your designs and can't wait to try them out...
The apron design is a firm favourite so far, and should be a nice addition to my recipe card book and I have a wonderful book called Christmas Gifts from the kitchen which allows me to make cookie and cake mixes to give where all that is needed is to add liquid ingredients.
Thanks again Flo.
The apron design is a firm favourite so far, and should be a nice addition to my recipe card book and I have a wonderful book called Christmas Gifts from the kitchen which allows me to make cookie and cake mixes to give where all that is needed is to add liquid ingredients.
Thanks again Flo.
Monday, September 13, 2010
Mosaics
This is one craft that I won't be taking up ... I started a mosaic picture a few weeks ago and when I started cutting the tiles realised that I am allergic to the dust it causes... I had to have a friend finish my designs for me (being ambitious, I started not just one, but two designs...), however, in return I have background quilted a wall quilt for her. I will post pictures of both projects soon. The mosaics look fabulous and I am so grateful to her for finishing them for me and I hope she loves her quilt now that it is all quilted.
Wedding Planner Journal
I created this for the bride to be to be able to write down all her lists, keep track of important dates and appointments and organise the big day. There are plenty of pages to put swatches of fabric, images of cakes and table decorations, times to meet with the family and other wedding party members and dates to pick up dresses etc. I got a visual diary (pre bound and cut etc, but easily made with a Zutter or Cinch if you like) I created the dividers with spellbinder nested hearts dies and cut out a whole lot. I then added black kindyglitz to the edges and pasted them to the sides of the pages to make file dividers.
I then cut several different sizes of the hearts for the cover out of fun foam and heated it and pressed in several cuttlebug images. I then added a handmade rose (using Tim Holtz technique to make roses) using the Cricut Wildcard Cartridge to make the initial flower. I added a swirl of diamante bling and some kindyglitz and shaved crystals. I tied organza and satin ribbon on the spine and inside I added some stamping and rubons in a love related theme.
 Thanks for looking!
I then cut several different sizes of the hearts for the cover out of fun foam and heated it and pressed in several cuttlebug images. I then added a handmade rose (using Tim Holtz technique to make roses) using the Cricut Wildcard Cartridge to make the initial flower. I added a swirl of diamante bling and some kindyglitz and shaved crystals. I tied organza and satin ribbon on the spine and inside I added some stamping and rubons in a love related theme.

Engagement Album - Sneak Peak
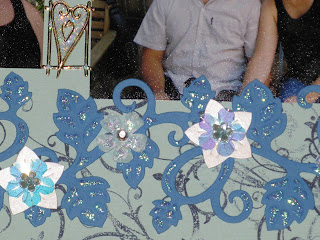
Here are a few sneak peaks at the engagement album that I created, some beautiful flowers, sparkle and shine and a theme of blues compliment the design and created a beautiful album which I hope the receipients are happy to remember their special moment!!!


Hexagons and Bedford Scrapbook Layout
Hope you are all well and having a great time. Being in Auckland, I was sufficiently far away from Christchurch so that we were not affected at all by the recent quakes. My thoughts are with you all during this time while you rebuild and reflect.
I posted a layout of Bedford a while ago and here is the other layout I did for my photo's from there. I loved the brick buildings and took hundreds of photos (my six week trip was documented with over 6000 photo's so I have been selective (or as selective as you can be when looking at so many images) and these made the final cut. To prevent having about 3000 albums for one holiday, I have done a lot of layouts where I try to incorporate multiple photos on my layout and also try and use all the pamphlets and memorabilia that I dragged home.
Hope you enjoy. The font is Cuttlebug 'Hippie Chick' and the hexagons are using my Creative Memories Custom Cutting System. I started off my paper crafting with these tools and still reach for them as an when I need. I still need to work out how to 'create' larger shapes like these on my cricut as this will make the whole process a lot easier.
+-+Copy.JPG)
I posted a layout of Bedford a while ago and here is the other layout I did for my photo's from there. I loved the brick buildings and took hundreds of photos (my six week trip was documented with over 6000 photo's so I have been selective (or as selective as you can be when looking at so many images) and these made the final cut. To prevent having about 3000 albums for one holiday, I have done a lot of layouts where I try to incorporate multiple photos on my layout and also try and use all the pamphlets and memorabilia that I dragged home.
Hope you enjoy. The font is Cuttlebug 'Hippie Chick' and the hexagons are using my Creative Memories Custom Cutting System. I started off my paper crafting with these tools and still reach for them as an when I need. I still need to work out how to 'create' larger shapes like these on my cricut as this will make the whole process a lot easier.
+-+Copy.JPG)
Thursday, August 26, 2010
12" x 12" scrapbook paper books with pockets
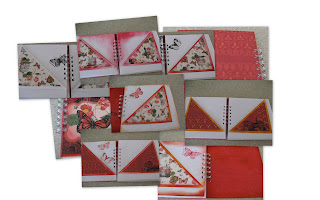
These are so much fun to make, you take a 12x12" sheet of paper and fold it in half then in half again. I used white paper and then bind them together with two 6x6" chipboard covers that you have decorated as desired.
To create the stunning red butterfly book, I used the fabulous Mariposa DCWV cardstock for embellishing the covers and adding accents to the pages. I used Stampin Up ink in ruby red,rose red and pumpkin pie to add colour and stamp the hero arts butterflies. I also used versamark clear and clear embossing powder to create the gloss finish on the cover.
The blue and green creation was a class I attended. This used the Stampin Up range of papers and colours. The predominant colours were Night of Navy and Kiwi Kiss. The Urban Series of paper was used for the embellishments.
Both books were bound using a Zutter Bind-It-All.
 Hope you enjoy!
To create the stunning red butterfly book, I used the fabulous Mariposa DCWV cardstock for embellishing the covers and adding accents to the pages. I used Stampin Up ink in ruby red,rose red and pumpkin pie to add colour and stamp the hero arts butterflies. I also used versamark clear and clear embossing powder to create the gloss finish on the cover.
The blue and green creation was a class I attended. This used the Stampin Up range of papers and colours. The predominant colours were Night of Navy and Kiwi Kiss. The Urban Series of paper was used for the embellishments.
Both books were bound using a Zutter Bind-It-All.


Tuesday, August 24, 2010
Scrapbooking - Santa Maria Sofra and Minerva
I loved Rome and found the churches and buildings to be amazing. I loved how there were these ancient structures and someone had put modern touches to them. I loved how there were stunning sculptures throughout the city and how accessible the beauty and art was.
I loved the colour of the bricks and wanted to echo this in my layout. This is using white cardstock and sponging it. I used a mix of Stampin Up colours including Really Rust, Bravo Burgundy and Pumpkin Pie. I then used the So Swirly Roller and created the lovely swirl effect, and added script stamps over some of the cardstock to have a contrasting paper. I used plain cardstock and cut the letters from Cuttlebug "Curls n Swirls" alphabet. I added journalling and some hand dyed crocheted flowers dyed using the co-ordinating inks from the layout.
 I used circular cutouts to highlight the fluid architectural forms in my photos.
I loved the colour of the bricks and wanted to echo this in my layout. This is using white cardstock and sponging it. I used a mix of Stampin Up colours including Really Rust, Bravo Burgundy and Pumpkin Pie. I then used the So Swirly Roller and created the lovely swirl effect, and added script stamps over some of the cardstock to have a contrasting paper. I used plain cardstock and cut the letters from Cuttlebug "Curls n Swirls" alphabet. I added journalling and some hand dyed crocheted flowers dyed using the co-ordinating inks from the layout.

Scrapbooking - Olney

Scrapbooking - Bedford
Hope you are well, it has been hectic of late and I have not spent much time uploading my photos. I have finished the engagement scrapbook album and a few other projects which I will show you as I have time to upload them, as well as keeping up with my studies, working and finding time to craft...
During my European Trip, my main point of reference was Bedford, as I had family friends who I stayed with there. It is an interesting area of the country and is close to Milton Keynes, Olney and Cambridge and the train to London left frequently, making it an ideal base.
I had to encorporate lace into my layouts as Bedford and Olney were the lace making centres of England, and therefore I wanted to be sympathetic to this heritage. I loved the brickwork and symmetry in the design of a number of the buildings and wanted to encorporate a number of photos at once into my layout.
I used Creative Memories for the hexagonal shapes, Bosskut dies for the flourish, the title was cut in Cuttlebug "Hippie Chick" and Bosskut "Apricot" fonts. I will upload the hexagonal designed page layout soon.
 Hope you enjoy!
During my European Trip, my main point of reference was Bedford, as I had family friends who I stayed with there. It is an interesting area of the country and is close to Milton Keynes, Olney and Cambridge and the train to London left frequently, making it an ideal base.
I had to encorporate lace into my layouts as Bedford and Olney were the lace making centres of England, and therefore I wanted to be sympathetic to this heritage. I loved the brickwork and symmetry in the design of a number of the buildings and wanted to encorporate a number of photos at once into my layout.
I used Creative Memories for the hexagonal shapes, Bosskut dies for the flourish, the title was cut in Cuttlebug "Hippie Chick" and Bosskut "Apricot" fonts. I will upload the hexagonal designed page layout soon.

Subscribe to:
Posts (Atom)